These arcade controls have been through at least 4 projects at this stage and have had little or no real use. The last incarnation had a retropie installation on a Raspberry pi 3 inside which I now need for another project.
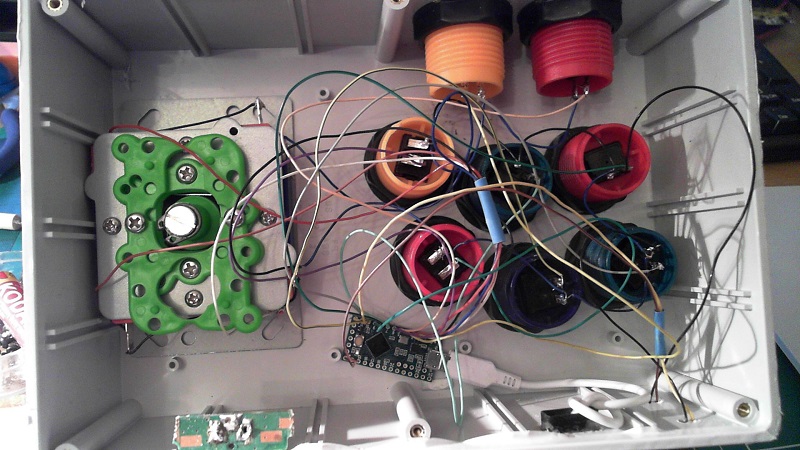
I've also had the Teensy LC sitting in a box doing very little for the 3 years I've had it so I thought I'd kill 2 birds and reuse the RasPi and put the Teensy to some good use. Also means we can use the arcade stick on any laptop/PC we have.
Setup
Primary use for the stick will be for Mame/SNES/Sega emulation. It will be configured as a keyboard so it will easy to configure each of the emulators to use as if just using a keyboard.
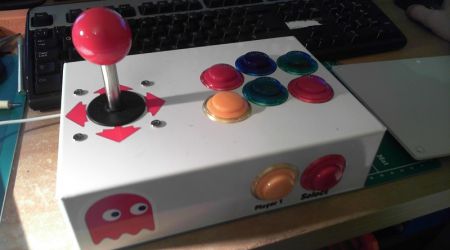
The box has a total of 14 buttons.
4 for the directions
6 for general buttons
1 Start
1 Select
2 Pushbuttons on the back which will be configured for ESC and another free.
The Teensy Sketch
The sketch itself is very simple. The Teensy is setup as a standard keyboard input and we enable the first 14 inputs (0-13) with internal pullups so the are active low when pressed. The Bounce.h debouncing library ensures we remove any unwanted presses from the buttons.
On detection of a button press we use:
if (button1.fallingEdge()) {
    Keyboard.press(KEY_UP);
  }
Once the button is released we do the opposite
if (button1.fallingEdge()) {
    Keyboard.release(KEY_UP);
  }
/* USB Arcade Stick
* All Buttons assigned as Keyboard keys for easy use with Emulation
*
* Original code from the Teensy Examples.
*/
#include
// Create Bounce objects for each button. The Bounce object
// automatically deals with contact chatter or "bounce", and
// it makes detecting changes very simple.
Bounce button0 = Bounce(0, 10);
Bounce button1 = Bounce(1, 10); // 10 = 10 ms debounce time
Bounce button2 = Bounce(2, 10); // which is appropriate for
Bounce button3 = Bounce(3, 10); // most mechanical pushbuttons
Bounce button4 = Bounce(4, 10);
Bounce button5 = Bounce(5, 10); // if a button is too "sensitive"
Bounce button6 = Bounce(6, 10); // to rapid touch, you can
Bounce button7 = Bounce(7, 10); // increase this time.
Bounce button8 = Bounce(8, 10);
Bounce button9 = Bounce(9, 10);
Bounce button10 = Bounce(10, 10);
Bounce button11 = Bounce(11, 10);
Bounce button12 = Bounce(12, 10);
Bounce button13 = Bounce(13, 10);
void setup() {
// Configure the pins for input mode with pullup resistors.
// The pushbuttons connect from each pin to ground. When
// the button is pressed, the pin reads LOW because the button
// shorts it to ground. When released, the pin reads HIGH
// because the pullup resistor connects to +5 volts inside
// the chip. LOW for "on", and HIGH for "off" may seem
// backwards, but using the on-chip pullup resistors is very
// convenient. The scheme is called "active low", and it's
// very commonly used in electronics... so much that the chip
// has built-in pullup resistors!
pinMode(0, INPUT_PULLUP);
pinMode(1, INPUT_PULLUP);
pinMode(2, INPUT_PULLUP);
pinMode(3, INPUT_PULLUP);
pinMode(4, INPUT_PULLUP);
pinMode(5, INPUT_PULLUP);
pinMode(6, INPUT_PULLUP); // Teensy++ LED, may need 1k resistor pullup
pinMode(7, INPUT_PULLUP);
pinMode(8, INPUT_PULLUP);
pinMode(9, INPUT_PULLUP);
pinMode(10, INPUT_PULLUP);
pinMode(11, INPUT_PULLUP);
pinMode(12, INPUT_PULLUP);
pinMode(13, INPUT_PULLUP);
}
void loop() {
// Update all the buttons. There should not be any long
// delays in loop(), so this runs repetitively at a rate
// faster than the buttons could be pressed and released.
button0.update();
button1.update();
button2.update();
button3.update();
button4.update();
button5.update();
button6.update();
button7.update();
button8.update();
button9.update();
button10.update();
button11.update();
button12.update();
button13.update();
// Check each button for "falling" edge.
// Type a message on the Keyboard when each button presses
// Update the Joystick buttons only upon changes.
// falling = high (not pressed - voltage from pullup resistor)
// to low (pressed - button connects pin to ground)
if (button0.fallingEdge()) {
Keyboard.press(KEY_LEFT);
}
if (button1.fallingEdge()) {
Keyboard.press(KEY_UP);
}
if (button2.fallingEdge()) {
Keyboard.press(KEY_DOWN);
}
if (button3.fallingEdge()) {
Keyboard.press(KEY_RIGHT);
}
if (button4.fallingEdge()) {
Keyboard.press(KEY_5);
}
if (button5.fallingEdge()) {
Keyboard.press(KEY_1);
}
if (button6.fallingEdge()) {
Keyboard.press(KEY_Z);
}
if (button7.fallingEdge()) {
Keyboard.press(KEY_X);
}
if (button8.fallingEdge()) {
Keyboard.press(KEY_C);
}
if (button9.fallingEdge()) {
Keyboard.press(KEY_A);
}
if (button10.fallingEdge()) {
Keyboard.press(KEY_S);
}
if (button11.fallingEdge()) {
Keyboard.press(KEY_D);
}
if (button12.fallingEdge()) {
Keyboard.press(KEY_ESC);
}
if (button13.fallingEdge()) {
Keyboard.press(KEY_F);
}
// Check each button for "rising" edge
// Type a message on the Keyboard when each button releases.
// For many types of projects, you only care when the button
// is pressed and the release isn't needed.
// rising = low (pressed - button connects pin to ground)
// to high (not pressed - voltage from pullup resistor)
if (button0.risingEdge()) {
Keyboard.release(KEY_LEFT);
}
if (button1.risingEdge()) {
Keyboard.release(KEY_UP);
}
if (button2.risingEdge()) {
Keyboard.release(KEY_DOWN);
}
if (button3.risingEdge()) {
Keyboard.release(KEY_RIGHT);
}
if (button4.risingEdge()) {
Keyboard.release(KEY_5);
}
if (button5.risingEdge()) {
Keyboard.release(KEY_1);
}
if (button6.risingEdge()) {
Keyboard.release(KEY_Z);
}
if (button7.risingEdge()) {
Keyboard.release(KEY_X);
}
if (button8.risingEdge()) {
Keyboard.release(KEY_C);
}
if (button9.risingEdge()) {
Keyboard.release(KEY_A);
}
if (button10.risingEdge()) {
Keyboard.release(KEY_S);
}
if (button11.risingEdge()) {
Keyboard.release(KEY_D);
}
if (button12.risingEdge()) {
Keyboard.release(KEY_ESC);
}
if (button13.risingEdge()) {
Keyboard.release(KEY_F);
}
} 
Key Assignments
| Pin | Code | Function |
|---|---|---|
| 0 | KEY_LEFT | Joy Left |
| 1 | KEY_UP | Joy Up |
| 2 | KEY_DOWN | Joy Down |
| 3 | KEY_RIGHT | Joy Right |
| 4 | KEY_5 | Insert Coin P1 |
| 5 | KEY_1 | Start P1 |
| 6 | KEY_Z | Button 1 |
| 7 | KEY_X | Button 2 |
| 8 | KEY_C | Button 3 |
| 9 | KEY_A | Button 4 |
| 10 | KEY_S | Button 5 |
| 11 | KEY_D | Button 6 |
| 12 | KEY_ESC | Escape |
| 13 | KEY_F | Free |